Setup Guide
Understand what each part of the slide does, what it expects from your character, and how a ride begins and ends.
The slide actor
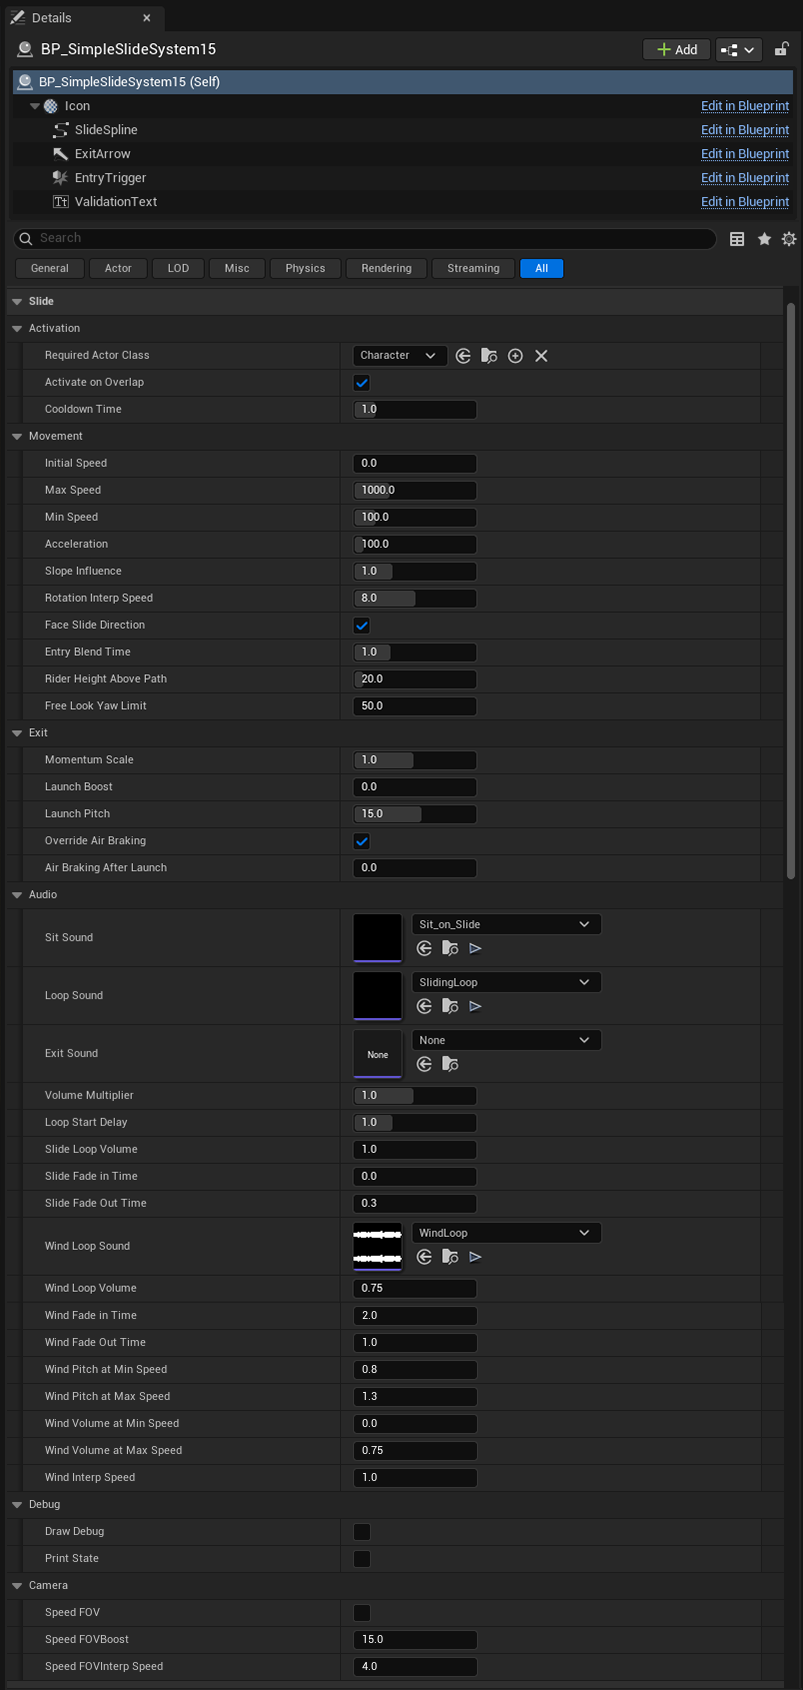
BP_SimpleSlideSystem is made of four components:
| Component | What it does |
|---|---|
| Slide Spline | The path the rider follows. The first point is the top; the last point is the exit. |
| Entry Trigger | A box at the first spline point. A Character walking into it starts a ride (when Activate On Overlap is on). |
| Exit Arrow | An editor preview pointing in the direction the rider will be launched. |
| Validation Text | Editor-only warning text that appears above the slide if something is set up incorrectly. |
All of the slide's options are in the Details panel under the Slide category, split into Activation, Movement, Exit, Audio and Debug. Hover over any setting in the editor to see its tooltip, or read the full Slide Settings Reference.
How a ride works
Every ride goes through the same four stages:
| Stage | What happens |
|---|---|
| Idle | The slide is waiting for a rider. It doesn't tick, so an idle slide costs nothing. |
| Entering | The rider glides from wherever they touched the trigger to the top of the slide over Entry Blend Time, easing in and out. |
| Sliding | The rider moves along the spline. Speed changes with the slope, the camera turns to follow, and sounds play. On Slide Started fires at the start of this stage. |
| Cooldown | The rider has been released (and usually launched). On Slide Finished has fired. After Cooldown Time seconds the slide returns to Idle. |
Turn on Print State to see each stage printed on screen as it happens. It's the quickest way to understand what the slide is doing.
Spline setup
The spline is the slide. Everything else — the trigger position, the launch direction, the rider's speed on slopes — is worked out from it.
- Direction matters. Riders always travel from the first point to the last point.
- Minimum size. The spline needs at least 2 points and must be longer than 1 unit. Otherwise the slide shows "SETUP ERROR: the slide spline needs at least 2 points and must be longer than 1 unit." and won't accept riders.
- Slope drives speed. Downhill sections speed the rider up; uphill sections slow them down. How much depends on Slope Influence.
- The end angle sets the launch. The rider is launched along the direction of the last section of spline, tilted by Launch Pitch.
- Riders only turn left and right. The rider follows the slide's yaw (heading) but never tilts or rolls, even on banked or looping sections.
Use enough points to follow curves cleanly, but no more. Fewer, well-placed points give smoother curves than many points crowded together.
The slide measures its spline once when play begins. If you change the spline's shape while the game is running (for example from your own Blueprint), the slide won't know the new length. Shape slides in the editor.
Entry trigger behaviour
The Entry Trigger is a box that starts rides automatically.
- It always snaps to the first spline point whenever the slide is moved or edited. To move the entrance, move the first spline point.
- When something walks into it, the slide checks it's a Character and offers it a ride by calling Activate Slide. That function decides whether the ride can actually start.
- Only one rider can use a slide at a time. If the slide is busy or cooling down, the trigger is ignored.
- Turn Activate On Overlap off if you want rides to start only from your own logic — for example an interact button.
Because the rider glides from wherever they touched the trigger to the top of the slide, the trigger can sit slightly in front of the slide entrance and the transition will still look smooth.
Rider requirements
A rider must be:
- A Character (or child class),
- with a Character Movement Component,
- of the Required Actor Class or one of its child classes (default: any Character).
Your character doesn't need any slide-specific code, interfaces or input handling. While riding, the slide switches Character Movement off and moves the rider itself; when the ride ends it switches movement back on.
To stop NPCs and AI from riding, set Required Actor Class to your player Character Blueprint. Any other Character walking into the trigger will be ignored.
If another system switches the rider's movement back on mid-ride, the slide switches it off again on the next frame, so the ride carries on.
Camera requirements
When Face Slide Direction is on (the default), the slide turns the player's view to look down the slide and pauses mouse look for the ride.
The slide does this by steering the control rotation — the direction the player is "looking". For that to be visible, your camera must follow control rotation:
- Third-person characters: select the Spring Arm (Camera Boom) component and enable Use Pawn Control Rotation.
- First-person characters: select the Camera component and enable Use Pawn Control Rotation.
The standard Unreal third-person and first-person templates already have this enabled.
- How quickly the camera turns is set by Rotation Interp Speed. Values of 6–10 follow twists closely while staying smooth.
- Mouse look is given back when the ride ends.
- Prefer to let players look around freely? Turn Face Slide Direction off.
Collision behaviour
During a ride, the rider's capsule is switched to query-only collision. This means:
- The rider slides past walls, rails and the slide mesh itself without getting snagged.
- Trigger volumes along the slide still detect the rider. The rider is moved in small steps no larger than their capsule, so triggers aren't skipped even at high speed — useful for splash effects, checkpoints or sound zones.
The rider's original collision setting is remembered when the ride starts and restored exactly when it ends.
Because the rider passes through solid geometry during a ride, the spline — not the mesh — decides where the rider goes. Make sure the spline follows the surface of your slide mesh.
Lining the rider up with your mesh
A Character's position is the centre of its collision capsule. If your spline runs along the surface of the slide, the rider's centre will be on the surface and they'll appear half-sunk into it.
Fix this with Rider Height Above Path: set it to about half the capsule height — around 88 for the Unreal mannequin. Alternatively, raise the spline itself above the slide surface and leave the setting at 0.
A small negative value is allowed, which can help on low-slung slides where the rider should sit slightly deeper.
Exit behaviour
When the rider reaches the end of the spline:
- The Exit Sound plays (if set) and the sliding loop fades out.
- The rider's original collision is restored and Character Movement is switched back on (falling).
- The rider is kept exactly where they are — only nudged clear if they overlap something — then launched.
- Mouse look is given back and the air braking override is applied.
- On Slide Finished fires and the cooldown starts.
Launch direction and speed
The launch aims along the end of the slide, tilted up by Launch Pitch (limited to ±89°). Launch speed is:
Launch speed = slide speed × Momentum Scale + Launch Boost (never below zero)The Exit Arrow in the viewport always shows the resulting launch direction, so you can aim the launch visually while you edit.
Air braking
Characters normally slow down in the air. With Override Air Braking on (the default), the rider's air braking is temporarily replaced with Air Braking After Launch so they fly the full arc. Their original value is restored once they land (after a short 0.1 s grace period), or after 5 seconds in the air at most.
Blocked exits
If the rider's position at the end of a launch exit is completely blocked, they're moved to a safe spot just above the end of the slide, facing along it. If that is blocked too, the slide tries again higher up.
In the editor, the slide also shows a warning if the exit looks blocked. This check uses a standard-sized capsule, so treat it as a helpful hint rather than a guarantee.
Cancelled rides
Rides can also end early with Cancel Slide, which either launches the rider from where they are or simply drops them. If the slide is destroyed or the level ends mid-ride, the ride is cancelled automatically and the rider's settings are put back — a Character is never left frozen.
Using your own slide mesh
The slide actor contains no mesh — it's just the path. This means you can use any mesh as your slide: the included examples, a marketplace asset, or something you've modelled yourself.
- Place your slide mesh in the level as a normal Static Mesh actor.
- Place
BP_SimpleSlideSystemnear the top of it. - Move the spline points so the spline follows the surface of the mesh from top to bottom.
- Set Rider Height Above Path so the rider sits on the surface (see above).
- Press Play and adjust until the rider follows the surface cleanly.
Turn on Draw Debug to show a sphere on the rider during the ride. It makes it much easier to see where the path is relative to your mesh.
Practical examples
A gentle playground slide
- Short spline with a moderate slope.
- Max Speed around 800, Min Speed 100–200 so riders never stall.
- Launch Boost 0, Launch Pitch 0–10 for a soft hop off the end.
A fast water-park tube
- Long, twisting spline.
- Max Speed 1500–2500, Slope Influence 1–2.
- Rotation Interp Speed 8–10 so the camera keeps up with tight turns.
A launch ramp
- Spline ending on an upward curve.
- Launch Boost 500–1500, Launch Pitch 20–40.
- Keep Override Air Braking on with Air Braking After Launch at 0 so the rider flies the full arc.
- Check the Exit Arrow to aim the landing.
A slide started by a button
- Turn Activate On Overlap off.
- From your interact logic, call Activate Slide with the player Character. See the interact example.